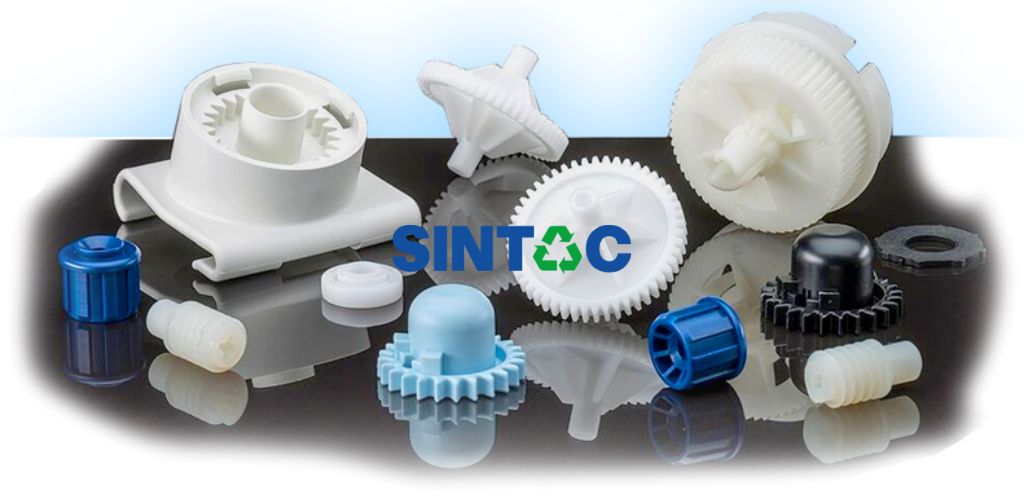
Plastic injection moulding
Plastic components are used in many industries. From automotive to household appliances and medical devices, components made from a wide variety of plastics are used to protect, enhance and build a huge range of products. However, very few manufacturers know exactly how their plastic components are made.
Injection moulding is one of the most widely used processes for manufacturing plastic components. In fact, the compound annual growth rate (CAGR) of the injection moulded plastics market is expected to increase by 4.6% until 2028.
However, despite its ability to produce large quantities of plastic components quickly, the injection moulding process must be strictly controlled to maintain the quality of the final parts. This article will explain how injection moulding works and how experienced manufacturers control the process to produce the best quality plastic components.
Plastic injection moulding, what it is and how it work
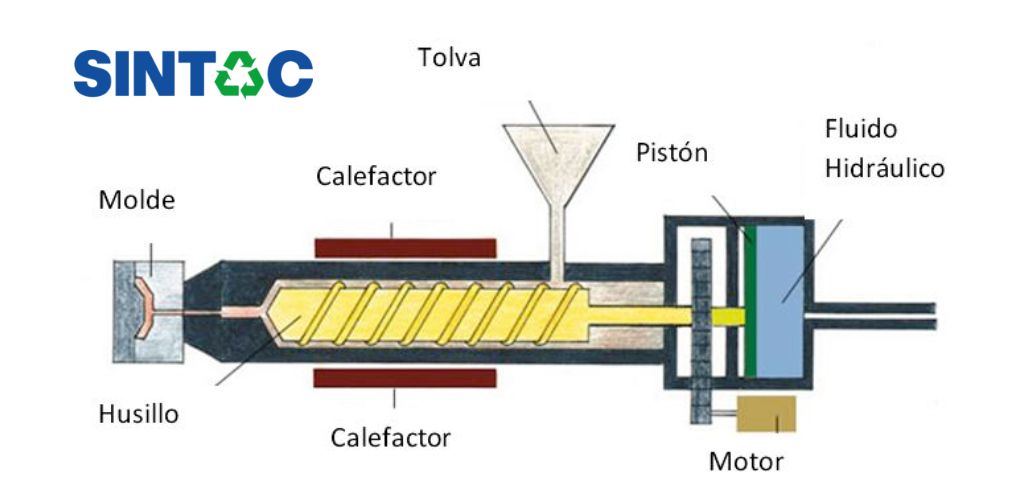
Injection moulding is a complex manufacturing process. Using a specialised hydraulic or electric machine, the process melts, injects and fixes plastic into the shape of a metal mould that fits into the machine.
Plastic injection moulding is the most widely used component manufacturing process for a number of reasons, including:
Flexibility: manufacturers can choose the mould design and the type of thermoplastic used for each component. This means that the injection moulding process can produce a wide variety of components, including complex and highly detailed parts.
Efficiency: Once the process has been set up and tested, injection moulding machines can produce thousands of parts per hour. The use of electric injection moulding machines also makes the process relatively energy efficient.
Consistency: If the process parameters are strictly controlled, the injection moulding process can produce thousands of components quickly with consistent quality.
Cost-effectiveness: once the mould (which is the most expensive element) is built, the production cost per component is relatively low, especially if it is created in large quantities.
Quality: whether manufacturers are looking for strong, tensile or highly detailed components, the injection moulding process is capable of producing them with consistently high quality.
This cost-effectiveness, efficiency and component quality are just some of the reasons why many industries choose to use injection moulded parts for their products.
what is a plastic injection mould?
It is based on a die that receives and distributes the molten plastic material, to be formed, cooled and then ejected from the moulded part.
- From the specifications of the thermoplastic, it is necessary to take into account its shrinkage, flow and abrasion characteristics and heating and cooling requirements.
- Know the plan of the part to be moulded, establish the parting lines, entry area, location of the moulding bosses and mould details that can facilitate the construction of the mould.
- Determine the type of moulding machine and the effect it can have on the mould design.
There are many points that must be taken into account for the construction of a mould: the materials for its construction, the methods of making the mould, the design and characteristics of the mould and the part to be manufactured among others.
what are its parts?
An injection moulding machine consists of the following parts:
Hopper
Movement screw
Heaters
Nozzle
Extraction pin
Split moulds
Clamping unit
Injection unit
Drive unit
Hydraulic unit
The function of each part of an injection moulding machine.
Hopper:
Here we introduce the plastic material ingredients for the moulding process.
Moving screw or Archimedes screw:
Pushes the plastic material ingredients in a forward direction.
Heaters:
It is used to increase the temperature of the system to prepare the product in a good finish and.
We can say that the heater works to melt the plastic polymer ingredients.
Nozzle:
The temperature of the material increases to such an extent that it quickly enters the mould cavity.
Extraction pin:
Functions as split moulds and the formed shape to be removed from it and the subsequent process to be carried out.
Split mould or cooling channels:
Cooling of the product made in the system.
Clamping unit:
Used to clamp the tool.
Injection unit:
In the injection unit, it can be used to inject the mould (Plastics).
Drive unit:
The drive unit is used to ram the mould into the cavity.
Hydraulic system:
Tamping of the mould by the press.
Types of plastic injection moulds:
There are many variants of the injection moulding process including:
Cube moulding
Pressure moulding
Gas-assisted injection moulding
Liquid silicone rubber injection moulding
Metal injection moulding
Micro injection moulding
Reaction injection moulding
Thin wall injection moulding
How does plastic injection moulding work?
Step 1: Selecting the right thermoplastic and the right mould
Before the actual process begins, it is critical to select or create the right thermoplastics and moulds, as these are the essential elements that create and shape the final components. In fact, to make the right selection, manufacturers must consider how the thermoplastic and mould interact together, as certain types of plastics may not be suitable for certain mould designs.
Each mould consists of two parts: the cavity and the core. The cavity is a fixed part into which the plastic is injected, and the core is a movable part that fits into the cavity to help give the final shape to the component. Depending on requirements, moulding tools can be designed to produce multiple or complex components. Due to the high pressures and temperatures to which they are repeatedly subjected, moulds are usually made of steel or aluminium.
Due to the high level of design and quality of materials, mould development is a time-consuming and costly process. Therefore, before creating a final custom mould, it is recommended that tools are created, prototyped and tested using computer-aided design (CAD) and 3D printing technology. These tools can be used to digitally develop or create a prototype mould that can then be tested on the machine with the chosen thermoplastic.
Testing the tool with the right thermoplastic is key to ensuring that the final component has the correct properties. Each thermoplastic offers different characteristics and resistance to temperature and pressure due to its molecular structure. Plastics with an ordered molecular structure are called semi-crystalline and those with a looser structure are known as amorphous plastics.
The properties of each plastic will make them suitable for use in particular moulds and components.
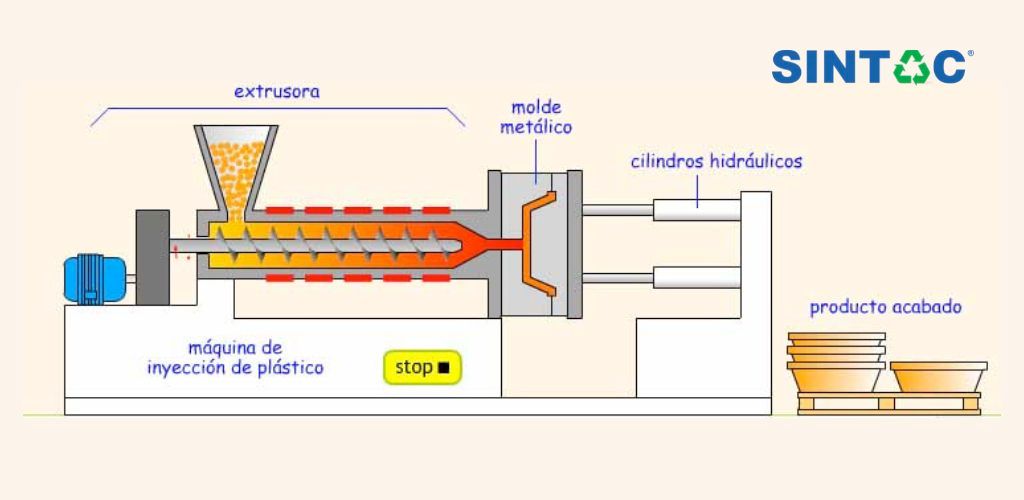
Step 2: Feeding and melting the thermoplastic
Injection moulding machines can be hydraulically or electrically powered. Increasingly. At their most basic level, these machines consist of a feeder or “hopper” at the top of the machine; a long heated cylindrical barrel, in which sits a large injection screw; a gate, which sits at the end of the barrel; and the chosen moulding tool, to which the gate is connected.
To start the process, granules of the chosen thermoplastics are fed into the hopper at the top of the machine. As the screw rotates, these granules are gradually fed into the barrel of the machine. The rotation of the screw and the heat of the barrel gradually heat and melt the thermoplastic until it is melted.
Maintaining the correct temperatures in this part of the process is key to ensuring that the plastic can be injected efficiently and that the final part is formed accurately.
Step 3: Inject the plastic into the mould
Once the molten plastic reaches the end of the barrel, the gate (which controls the injection of plastic) closes and the screw moves backwards. This sucks in a certain amount of plastic and increases the pressure in the screw, which is then ready for injection. At the same time, the two parts of the mould are closed and kept under a high pressure, known as the closing pressure.
The injection pressure and the closing pressure must be balanced to ensure that the part is formed correctly and that no plastic escapes from the tool during injection. Once the proper pressure is reached in the tool and screw, the gate opens, the screw advances and the molten plastic is injected into the mould.
Step 4: Holding and cooling time
Once most of the plastic has been injected into the mould, it is kept under pressure for a certain amount of time. This is known as “hold time” and can range from milliseconds to minutes depending on the type of thermoplastic and the complexity of the part. This hold time is key to ensuring that the plastic packs into the tool and forms correctly.
After the hold phase, the spindle is withdrawn, releasing the pressure and allowing the part to cool in the mould. This is known as the “cooling time”, which can also vary from a few seconds to a few minutes and ensures that the part is properly seated before being ejected and finished on the production line.
Step 5: ejection and finishing processes
Once the holding and cooling times have elapsed and the workpiece is mostly formed, pins or plates eject the workpieces from the tool. They fall into a compartment or onto a conveyor belt at the bottom of the machine. In some cases, finishing processes such as polishing, dyeing or the removal of excess plastic (known as spurs) may be required, which can be carried out by other machines or operators. Once these processes are completed, the components are ready for packaging and distribution to manufacturers.
Plastics used for injection moulding
The most common thermoplastics used in injection moulding and their characteristics include:
Acrylonitrile-Butadiene-Styrene (ABS) – with a smooth, rigid and tough finish, ABS is ideal for components requiring tensile strength and stability.
Nylons (PA) – available in a wide range of types, different nylons offer a variety of properties. Typically, nylons have good temperature and chemical resistance and can absorb moisture.
Polycarbonate (PC) – PC is a high-performance, lightweight plastic with high impact resistance and stability, as well as good electrical properties.
Polypropylene (PP): With good fatigue and heat resistance, PP is semi-rigid, translucent and tough.
The final choice of thermoplastic will depend on the characteristics that manufacturers require of their final component and the mould design. For example, if a manufacturer needs a lightweight part with electrical properties, then PC will be suitable, but only if the mould does not have to operate above 135C or at very high pressures, which the plastic will not be able to withstand.
Once the right thermoplastic and mould have been tested and selected, the injection moulding process can begin.
Plastic injection moulding cycle
Injection moulding is the high-pressure injection of a polymer into a mould where it is shaped. The individual parts of this process are very short. The entire injection moulding process usually takes between 2 seconds and 2 minutes. The cycle consists of four stages. These stages are clamping, injection and cooling.
Clamping
Before injecting the material into the mould, the two halves of the mould must be clamped together. They are closed by means of a clamping unit. Both halves are then clamped in the injection moulding machine and one of them can slide. The material is then injected while the clamping unit pushes the halves together and both halves are held firmly while the material is injected. Larger machines (machines with more clamping power) take longer to close and clamp the mould.
Injection
The plastic granules are fed into the injection moulding machine via a hopper. The injection unit moves the granules into the mould. The heat surrounding the cylinder and the pressure serve to melt the granules. The volume of material injected is called the “shot”. The injection time ends when 95%-99% of the mould has been filled. It is difficult to calculate the injection time exactly because the flow of plastic is always changing and dynamic. The injection time can be estimated by other factors such as injection pressure, power and injection volume. The injection pressure can range from 35 to 140 MPa. The injection speed and the pressure that can be reached are determined and controlled by the machine’s hydraulics.
Cooling
The cooling process is where the plastic inside the mould starts to cool after it comes into contact with the inner mould. As the plastic cools, it will harden into the desired shape. The part may shrink slightly during cooling. Only after the cooling period has elapsed can the mould be opened.
Featured Articles